Sunday, August 16, 2015

Improvisation on the Improv Tote

Quilt as You Go (QAG) is a favorite  of mine because of the many variables in design when doing it. It is quick and easy and if you haven't tried it, I think once you do, you will love it too.

When I first saw this easy quilting project from Jenny of MSQC and Vanessa of Crafty Gemini, I immediately started looking for a jelly roll to make one.  Of course you can use 2 1/2 in strips, but using the jelly rolls are really fun. I've posted their videos  at the bottom to show you how they quickly made these bags. They will also provide a list of materials you need, but what I love about the bag is the Bosal Foam. You can get it in various sizes, single sided fusible and double sided fusible.

For the tote I made, I chose a jelly roll and liner from the Low Tide Collection by Jane Dixon from Andover.  I also chose the foam with only a single fusible side.  You can buy it in various sizes depending on what you are making and the size you want. I also wanted a little contrast to this tote so I used a faux leather ( sorry, I don't know where I got it) for the straps and bottom.

You don't have to do this, but I separated the strips from the jelly roll into three different color values. I thought this would make it easier to choose as I sewed them to the foam.
Now the fun part: begin with two pieces of strips and sew them right sides together on top of the foam, along one side. You really can't make a mistake with the QAG method.  You don't have to start in the middle or on the end, you can start wherever you want to and use whatever size to start with. 


After I kept piecing and sewing, I pressed the pieces so they adhered to the foam. This is just so cool.
Keep on going' however you wish.
Here's a look at the back. Not the greatest site, but who cares? No one will see it anyway.
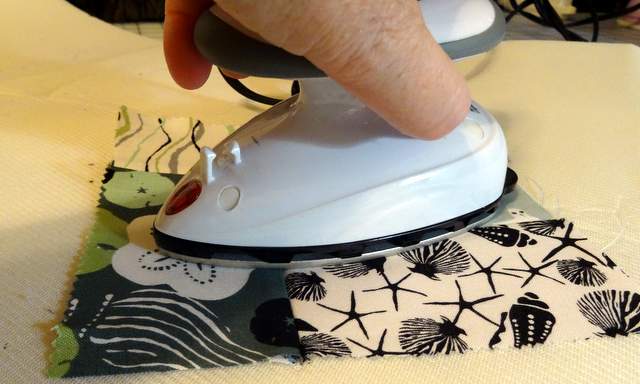
Keep on selecting your pieces, sew and press.  


When you have the entire piece of foam covered with strips, press it again and trim each of the sides. 


At this point, if you want to, you can add another quilt design. I decided to do an easy wave design in keeping with the ocean, wave,  and tide theme.
This picture isn't the greatest, but you can see the waves on the wrong side of the foam as well.  
Here is where I decided to add some additional improvisation to this project. I wanted to add a little more contrast to this project.  I cut the foam in half and sewed it right sides together at what I determined to be the bottom.
I then cut a piece of my faux leather and placed it equidistant on either side of the bottom seam. I topstitched it to the QAG and foam.
I also made the handle out of the faux leather by cutting them the length I wanted,
and folding them in and clipping them with quilt clips to hold in place. I didn't want to use pins because they would leave holes I didn't need or want. I  also used a leather needle for this material.
Oh No! My machine has been used so much this summer, it's in need of a tune up! Time to add some oil. :)

Back to the tote: I placed and sewed the handles of the bag where I wanted them.
My second improvisation to this bag is the addition of pockets on the bag liner. A woman cannot have too many pockets in her bags.  This is very easy to do, cut a piece of fabric the depth you want and the length of a side. Sew a line where you want to divide the pockets.
At this point you need to sew the sides and adjust the bottom corners of the bag. The videos I posted below do a much better job showing you this than I could, so check it out before sewing the lining to the bag as I have below. Be sure to leave an opening in a side of the lining because this is where you will turn it right side out.
After you sew the lining to the foam, be sure to trim close to your stitching line.
Now you can have some fun flipping the bag right side out through that opening in the liner.  
The third improvisation I made to the bag was to add a magnetic closure. Just a little extra protection for keeping the contents of the bag inside where they belong.

Top stitching is next. Once I pushed the liner inside the bag, I stitched through all layers around the top of the bag, including over the handles.
So what do you think? I like this bag because it is deep, has many pockets and looks interesting with the QAG design and pattern of the fabric. I've had so many really great comments about it. I'm definitely going to make more.  


Lessons Learned:
1. I'm glad a separated the different colors at the beginning. I think they are spread out nicely on the bag.
2. When I added the magnetic clasp, I forgot to put them on before sewing the lining and the outer shell together. I had to get the good old seam ripper out and take out some of the seams to get the magnets in. Next time it will be done right.
3. I used the foam on some Halloween Coasters  I made as a precursor to this project because I had never done QAG before. I can't wait to see what else I can use this great product for.


I can totally see a blog hop about what others have made using this foam. Have you used the Bosal foam for a project? I'd love to see  your ideas.

Thanks for stopping by One Twenty Seven.


This project is partying at : 


Tuesday, August 11, 2015

Embroidery Learning Curve

For the past few years I've really wanted to delve into learning how to embroider by machine. I have a Bernina QE 440 machine which I thought was perfect for the task.  My passion will always be sewing, but I thought embroidery would give my sewing an extra special touch.  
When I purchased the Bernina on Ebay I thought I died and went to heaven. I had been sewing on "another" machine for years. The Bernina was like.... well try and visualize a comparison between a really bad pudding and the best NY cheesecake. I'm sure that isn't the best comparison, but I can't imagine ever using another machine. 
The model Bernina I have has an optional embroidery attachment. I tried and tried to figure it out, but the learning curve just wasn't within my grasp. To make a long story short, I sold the QE 440 attachment on Ebay for enough to purchase  the Brother PE770 on Amazon's Black Friday in July sale. I really wanted a separate Embroidery machine, not an attachment I had to keep setting up and taking apart from my sewing machine I use all the time and on the spur of the moment. 
Embroidery is not something you can just start doing without doing a bit of research ahead of time. I fell back on my favorite library for research. Pinterest, and learned quite a bit about thread, stabilizers, hooping, etc. 
In  a previous post you can see how I made a quilt label. That was relatively easy. For this project I wanted to import some designs I purchased (for free, lol) online. This machine is great because I can transfer purchases to the machine via a USB stick. 
Once I followed the directions for the millionth time it started to go really well.

I purchased some bar mop cloths at Dollar General (we call it the mini Walmart) to practice these two designs. 
The only thing I didn't really like is the spool of embroidery thread to the left. I purchased a bundle on Amazon which was a deal, but on this spool there is no place to secure the thread to keep it from unraveling.  I'm a neat freak when it comes to my sewing supplies. It bothers me to have tangled up thread ends in my thread drawer.  I do like the spool to the right which has a neat design of just pulling the thread around the upper part of the spool. The little things.... I know. 

All in all, I'm pretty happy with the two experimental towels. They are cute for social gatherings.
I washed these towels after I embroidered them and they came out great. We'll see how many more washings they can with stand. 

Can you tell what I was thinking of while creating these projects? CHEERS! 

Lessons Learned: 
1. I think I should have used a water soluble stabilizer on the top.  I've read this product makes the embroidery look "more professional". 
2. I've learned I need to print a color chart for each design I do if it has more than two colors. I mark the steps by the colors so I don't loose track of what section will be embroidered next. 

 I would really like to hear your opinions about the Brother PE770 or embroidery tips and tricks in general. Feel free to comment if you have some wisdom to share. 

Thanks for visiting One Twenty Seven. 
 This post is linked to: