Sunday, April 20, 2014

Bunnies, Peeps and Easter Treats - Part 3

Are They Really the Best Sugar Cookies?   Easter Treats


A long while back I pinned a recipe called the "Best Sugar Cookie Recipe".  For many years I thought
my mother in law's white sugar cookies were the absolute best and I can't remember using any other recipe to bake cut out sugar cookies.  I usually make the cookies two or three times a year and decided to give the "best" recipe a try to see if it really it.

I wish I took more pictures of the process but pictures wouldn't provide a sense of how good these sugar cookies really are. Every claim the author made about the cookies was true: no need to chill, no burnt edges and they really were delicious.  Now I can't say they are the best, but I think they are at the top of the list. Thanks for a great recipe. I'll definitely be using it again.

Even the "one ear" cookie tasted delicious.


Lessons Learned:

1. Make sure you have all the ingredients you need before you begin!


Lemon Large


I must give a shout out to my sis,Val, for attempting and creating these luscious looking cookies.  Yes, they are called Giant Lemon Mousse Sugar Cookie Cups. I'm not exactly sure what recipe she used but you can find it at
 Wishes and Dishes.

To me they look like a monstrous filled cake that could be substituted for the dinner beforehand. Better not though or the cook might get mad. :)

Here's Val's creation with an extra touch of tart on top.


Looks delicious!  Now I'm thinking..... maybe a chocolate cookie cup, vanilla cream cheese mousse, with chocolate chip eyes might be a good goblin treat for Halloween? Val? Are you reading this? ;)


We Love Coconut - Coconut Cream Cheese Pie

This recipe is a combination of  3 others I found online.  Most of my family loves coconut, therefore it seemed a logical choice for dessert this Easter holiday.

Ingredients

For the crust:
·       1 ½ c finely crushed shortbread cookies
·       ⅔ c flaked coconut
·       ⅓ cup melted butter or margarine

For the pie filling:
·       1 cup  flaked coconut
·       ½ pkg.   (8 oz.) light cream cheese
·       2  small pkg. instant vanilla pudding mix
·       2 cups  cold milk
·       1 cup thawed whipped topping
·       ½ tsp. vanilla


For the topping:
·       Remaining  ½ cream cheese
·       1 cup whipped topping
·       1 Tbsp. sugar
·       ¼ c toasted coconut

Directions


1.     Preheat oven to 325°.  Mix ingredients for crust until well blended.
Press evenly into a 9 in pie plate.  Bake 10-15 minutes or until golden brown.


2.   Microwave full 8 oz of cream cheese High for 10 sec. or just until softened; stir until creamy.


3.     Beat pudding mixes and 2 cups milk in medium bowl with whisk 2 min.
Add half the cream cheese; mix well. Stir in 1 cup of coconut and 1 cup whipped topping. Pour into crust.


4.     Combine  sugar and the other half of the cream cheese; mix well. Stir in 1 cup whipped topping.  spread over pie. Refrigerate at least 4 hours.


5.     Toast remaining coconut. Sprinkle toasted coconut over the pie just before serving.


I hope everyone enjoyed their own special Easter traditions and festivities.  

Now for a break from blogging to finish up with APPR. 

Saturday, April 19, 2014

Bunnies, Peeps and Easter Treats - Part 2

Basket of Bunnies

I saw this idea as I was looking for fabric online.  It looked like a fun idea for an Easter centerpiece.

I started by gathering a bunch of Easter print fat quarters. Always pre wash and press the fabric. 

I folded each fat quarter so I could pin the pattern on four layers of fabric.   I had some fabric left over that I've started an Easter table runner. I'm thinking I'm not going to get that done before Sunday. 

 Each bunny was cut using pinking shears. These bunnies are not sewed right sides together and then flipped to the right side, they are sewed around the outline of fabric. The pinking shears will prevent the fabric from fraying.


After all the bunnies were sewn wrong sides together, each was stuffed and the ends sewed.


Each bunny was given a ribbon tie and are now ready for the Easter parade,


 or rather their Easter basket home.


Lessons learned:

1. Start projects like this as early as you can. Use television time, or sitting in the sun ( if we every get some) to stuff the bunnies. I knew it was going to be a process that would take a little time, but the results were well worth it.

The original project can be found at The Little Fabric Blog . I like the classic linen bunnies on this page too. I might try them from burlap.


Felt Peeps

While Shannon is in the south, I found I needed something to keep me busy during the long rides to visit her. This was my first project made out of felt. It is so easy to work with. These little projects are now my go to "car craft" for those trips where boredom might set in.

This pattern can be found at Micheal Ann Made.  


Lessons Learned:

1. I need to brush up on my embroidery techniques. Instead of using felt for the eyes, I tried I French knot. I'll definitely be doing the eyes and noses over. ( Or maybe leave them on this set as a reminder and for some added character).


Peeps and Posies

Here's quick and easy way to brighten any table or serving area for the holiday.

Start with a container that fits into a container with about an inch or so space when you put the smaller into the larger. Fill with your favorite holiday candy or trinkets.

Fill the inner container with water and plant food and arrange your flowers how you like. I used my Cricut Explore to cut some paper peeps to add.


Lessons learned?

1. I really wanted a square container but couldn't find one in the stores near me. I'll be looking for one the next time I'm at HoLo.

2. The containers used here were just a bit to small. I would have liked to have more room for the flowers. This would work better for a display of a few yellow and pink roses.

I have one more post of Easter treats coming soon.

Hope you are enjoying getting ready for this spiritual and fun holiday.

Saturday, April 12, 2014

Bunnies, Peeps and Easter Treats - Part 1

Hanging With My Peeps

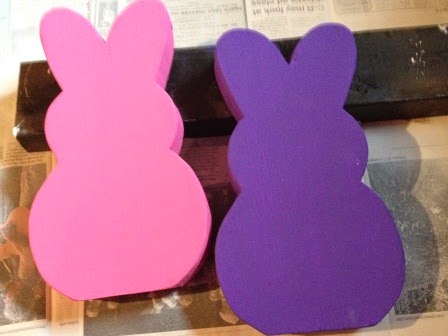
A few weeks ago I came home from work and found these wooden peeps on the kitchen counter. It was a not so subtle hint to get going on the peeps idea Rich saw on Pinterest. I guess he was bored one day (can't say I feel sorry for him, being retired and all) so he decided to do some wood work. 


After I chose the paint, he primed and painted. 


After the paint, I Mod Podged the peeps and added a layer of glitter to each. 


After they were nice and dry, I spray them with a Mod Podge sealer.  I hot glued some buttons on for eyes and began work on the base. 


Using my new Cricut Explore,  I cut the words from a sheet of vinyl. The new Cricut Explore makes it so easy. It even uses the fonts I have installed on my machine.


I applied them to a painted and Mod Podged 2x4.  Rich finished up by applying the peeps to the board.

What do you think? 


This was a fun project, especially since I  didn't have to cut or paint the wood. Rich is really getting the hang of this craft stuff. I just might have to add to his "honey do" list. 

Lessons Learned: 
1. Next time I'll use a darker color vinyl on the base. 

Have you made any peep crafts? I'd love to hear about them. 


Mesh Easter Wreath

These wreaths are so easy to make.  All you have to do is use twistie ties or chenille stems to  attach gathered mesh to a wire wreath form. 

Since Rich was cutting Peeps (above) I had him cut one out of 1/4"mdf board we had left from other projects.  We both painted a bunny face so it could be added to the wreath. 


I added some ribbon and a few easter flower novelties I picked up from Hobby Lobby (at 50% off), and a colorful door decor was born. 

Stay tuned for part two of Bunnies, Peeps and Easter treats.