Monday, February 17, 2014

Valentine Crafts


Table Runner

Last year  around St. Patty's day I started a Valentine's table runner using scraps of fabric and My Accuquilt Go cutter.  I actually finished it before Valentine's day this year, along with a few other goodies. It's just taken me until now to post.

I love the Accuquilt Go. It quickly cuts strips and shapes using a die cut so you don't have to cut each by hand with shears or rotary cutter. I used both the strips and hearts for the table runner.

I began by cutting the fabric the size of the die I used.  And rolled it through the cutter.


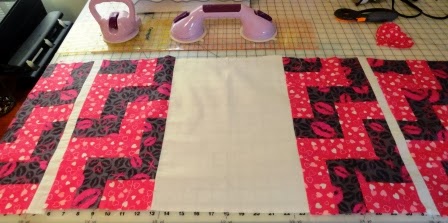
 I had no idea what kind of design I was going to do, at this point I was just winging it. I sewed the strips together, pressed them  and began  playing around with positioning the strips and squares.


I didn't have enough of the pink and grey fabric to make a long runner so I ended up offsetting what I had put together with white fabric.

Next up was cutting the hearts. Gosh I love this tool. It cut the hearts so quick and PERFECT! 


 I appliqued them on the runner,  and finished up the runner the same way I did the St. Patty's Day runner.


 And here's the finished product. Not bad for not having a pattern or knowing what it was going to look like before I started.

Fabric Vase Cover

One of my favorite go to sites for sewing projects is Sew4Home.  There are a variety of projects, they have fantastic giveaways and their tutorials are the best on the web (I think).  I found this project a while ago and decided this was the year I'm finally going to make one.

This is a great project to use up some scraps. I started with the glass container I was going to cover. Then measured and cut fabric for the main cover and ruffle at the top.  Once I placed and sewed the ruffle, I folded up the cover fabric, flipped it right side out and stitched the inside over the ruffle.


I used velcro to hold the cover together around the container, tied it with a bow and voila.


A different way to display flowers for any occasion. For the complete tutorial visit Sew4Home - Vase Skirts with Velvet Bows. 

Falling Felt Hearts


This was a fun project and easy too.  I cut heart shapes using my Accuquilt Go and sewed them using an applique stitch on the machine. I usually sew felt projects by hand, but wanted to try how the machine did on felt. Not too bad; however, depending on the project, I will probably go back to sewing them by hand.

Before grouping the hearts together, I stuffed each with a little fiber fill to give them some dimension.


After stuffing and closing up the openings on each heart, I sewed each heart bottom to the top of another heart leaving space so they could dangle and move wherever they were hung.  

 I then decided to add some sparkle by gluing on some rhinestones to catch the light when hung.


Valentine's Day was just a bit more festive this year at One Twenty Seven with these three projects.

Lessons Learned:

1. When measuring for the vase cover, be sure to allow for plenty of extra room for overlap. If using velcro, you might be able to use it on various size containers.

2. Use a little bit of fray check to keep the thread from coming out on the machine appliqued hearts.


Hope you had a lovely Valentine's Day.

Wednesday, February 5, 2014

It's a Man Thing, Jack

Hey, we are all to familiar with some of the sayings on Duck Dynasty , my husband especially. I decided to borrow a particular one from Phil to create a Happay, Happay, Happay birthday gift for Rich. Yes, you must spell it like it sounds to be truly authentic.  |

This past December, Rich got a 10 pointer deer. His brothers and others were disappointed he did not mount the deer head (I'm not one of the others).  I decided to make him something to remember the deer in addition to the quote from DD.

Out came the Cricut, some fabric and a pillow form. I've been wanting to try the heat transfer vinyl, so here was my chance.
I chose a fabric for the cover similar to that of white birch  to give it an outdoorsy look. The pillow form came from JoAnn Fabrics at 50% off.


I cut the fabric an inch larger than the pillow form and began by sewing the bottom of the fabric, right sides together, leaving an opening to stuff the pillow in when finished with the cover.


Next I opened the Cricut Craft Room Software and began designing what I was going to put on the pillow.  It's very important when using the heat transfer vinyl you flip your letters  and numbers. There are a number of different types of heat transfer vinyl.  I used the Cricut brand for the Happay lettering and  Neenah EPC Film from Amazon for the deer head. Follow the directions carefully for whatever vinyl you choose.


 When you are ready, fire up the Cricut and let it chirp away.


I ironed each of the designs on the pillow cover fabric using a pressing cloth. NEVER iron directly on to the vinyl.
After both sides of vinyl were cool, I sewed the remaining three sides with right sides together. Once trimmed and flipped , I stuffed the pillow inside and used a ladder stitch to finish it up. 


What do you think? Would the man in your life like something like this? I know a couple of relatives who are probably sooooo jealous.

Lessons Learned:

1. I can say as a result of this project I'm not a fan of the Cricut heat transfer vinyl. A couple days after the project was made, it started curling up on the edges. I've done iron ons before, and this stuff wasn't very good.

2. I do like the Neenah EPC Film. It seems lighter and adheres to the fabric so much better. However there is one little problem I didn't like. The Neenah EPC film was not as shiny as the Cricut vinyl.  You can see a little bit of the results in this photo. Neenah did suggest using a coated parchment paper to iron on over the film. I'm not ready to give up on it yet, not until I try the transfer paper.

Can you imagine the possibilities with heat transfer vinyl? I can.

And HEY, hope you have a happay, happay, happay day; Jack!


Sunday, February 2, 2014

Easy Game Day (or any day) Chicken Wings

I'm not a big fan of very spicy food, especially chicken wings. My favorite wings were those made at the Parrott House back in the day. My mom will know what I'm talking about.

This isn't a favorite of the guys with the steel stomach guts in my house, but here's a recipe that's really simple that everyone will like, including the little ones and us older people with sensitive stomachs.


Start  by mixing together the following ingredients in a gallon size ziploc bag:

1/3 Cup Soy Sauce
2 Tbsp. Oil
2 Tbsp. Chili Sauce
1/4 Cup Honey
1 tsp. Salt
1/2 tsp. Ginger
1/4 tsp. Garlic
1/4 tsp. Cheyenne Pepper

I used homemade chili sauce and crushed 
red pepper. The flavor was still really good. 


Add 12 - 15 wings and let set for at least 12 hours.   If you make them a day ahead of time it won't hurt anything. The longer you marinate them,  the yummier!


Line a baking sheet with nonstick foil. Pour the contents of the bag onto the baking sheet. 


Bake on 375°for 30 minutes.   Turn them over and bake for another 30 - 40 minutes. 


Let the party begin!