Sunday, January 11, 2015

A First and A Success: A Real Man's Quilt

In all my years of teaching I can't tell you the number of times I've heard the boys in my classes say: "Men don't sew. They especially don't want any handmade quilt!"   I can't wait to show them examples of guys who sew, and who sew quilts!  One of the last quilt shows I went to, in Middleburgh NY,  had a collection of quilts sewn by men and the room they were in was called THE MAN CAVE. It highlighted quilts all made by men. I think that's great. Here are a couple of their quilts. Both are very different and not typically what you would think a quilt looks like, but this is just two of many.


Now on to my purpose for this post. To the young boys in my classes, this next quilt might be more to their liking. My son's girl, Kelly, a very ambitious full-time college student, decided she wanted to make a special gift for her brother. I knew she was looking for some special printed fabrics awhile ago, and knew about the gift for her brother, but when I saw the beginnings of her quilt well into December I was floored. She wanted to make it for a Christmas gift! Had she ever made a quilt before? No. Oh boy. I didn't see her for awhile, but knew she was really busy. No.... really, really, really busy. In the weeks before Christmas she learned a few things about quilting from a neighbor and was determined to get it done in time.

The beginning of the quilt show the cut pieces on the ironing board. Below you can see the
pieces sewn together. In the pictures to the right they've been cut and sewn into a different design. 


Check out the fabrics? Can you see the country theme?  And that's my grand puppy, Buddy! He's a good dog.  He really wants to help. Although in the picture above, he was just too tired to lend a paw.


Looks like the border has been sewn together and plans are underway for the focal point. That's right, Chevy trucks are the big thing around here.


Kelly has certainly been very busy. The stress of cramming for finals and then for the holidays, especially when you want to make something personal is starting to show.  Her tutor helped her create the Chevy symbol and quilt a John Deere border around it. It was then appliqued to the tire rim fabric.  I think Kelly did an awesome job of picking out fabric that were representative of her brother's interests.  Isn't that was quilts are all about?

Here she is learning by doing.  Now comes the sandwich: quilt top, batting and backing.
Buddy is testing this time to see how comfy it is.


Merry Christmas brother.
Here's the finished product and Jeffrey with a big smile on his face. Now that is the true symbol of success. The quilt came out just wonderful. I think the black backing and border really help highlight the colors and chevy symbol. 

Now I ask the boys in my classes: "So what do you think about this quilt?"  I've actually showed some of them a few of the pictures. They say, "Can we make that instead of pillow?" Oh, no. What did I do to myself?!

At the end of each blog post, I try to think of a few lessons learned while creating a project. For thisparticular one, well, I guess there is some; but for a  first time quilt without any real sewing knowledge, the lesson is: 

If you can dream it, you can do it! Kelly wanted to do it and she did. FANTASTIC, Kelly. I am so proud of her. And Buddy, of course. 

Enjoy,

Sunday, November 9, 2014

Halloween Additions - Year 3

I wasn't going to post anything for Halloween this year, but a few people have asked to see the mesh wreaths I created for outside decorations.  So for those of you who are interested, here are the two I made.

Those Eyes!

Yes, this is what caught people's attention on the all black mesh wreath I put between the garage doors.  These large eyes aren't that common yet in the craft stores so make sure you call ahead before you go looking.

Supplies -

1 large roll of black mesh
1 roll silver and black spider web ribbon
6 jumbo pipe cleaners folded in half
1 set large movable eyes


Note - It rained heavily a few days during the month. This wreath got sopped. I took inside for a couple of days to dry out and it was good as new.


Wicked Hat and Legs

I've wanted to make this wreath for a few years now. I didn't really think I would get to it this year, but finally made the effort on Columbus day.


Supplies:

1 large roll of colored mesh
1 smaller width roll of complimenting color
1 roll complimenting ribbon
Embellishments of your choice


Lessons Learned?

There are many tutorials about how to put together mesh wreaths. Here is a very easy one.   Once you make one, you can make others. But watch out, it becomes very addicting!


Tuesday, July 29, 2014

Save Money and Clean with Old T-Shirts


Recycled Tee Project One: Swiffer Dry Mop Cover

A couple of years ago I came across a tutorial on Pinterest on how to make reusable Swiffer covers. Knowing how expensive the sheets are to buy, I set out to make a few of them and I've used them ever since. I used the family's old t-shirts that I was going to throw out because they had stains on. Creating these was a much better use than throwing them away.  Click here for a very simple tutorial you can use to make them. 


Recycled Tee Project Two: Dusting Cloths

Lay an old tee shirt out flat and cut out two equal sizes of the the shape  you would like.   I used an old ribbed cotton tank top for this project. I've made them out of smooth cotton shirts as well. Sew the two pieces together about 1/4 inch away from the edge. Leave an opening of about 3 -4 inches.


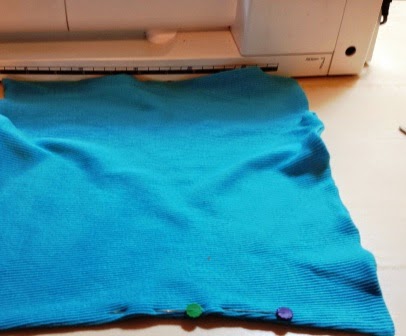
Turn the fabric right side out and pin the opening closed. 


Top stitch around the shape you created close to the edge catching both sides when sewing over the opening 


Use the decorative stitches on your machine to sew through both layers of fabric to keep it secure in the middle. 


Recycled Tee Project Three: Dusters Covers 

I found a simple tutorial  to get started creating the duster. You can find it here. I used a plain, smooth, old cotton shirt for this project.  


I started by cutting out 2,  8x8 pieces of fabric and 2, 4x6 pieces. 


I used an upside down small glass bowl and small glass as a template to round the corners of all pieces. 


Next, place the small piece on the bottom, place the two larger pieces on that, then place the second small piece on top. Pin through all layers of the fabric. Measure and mark a center line. Sew the marked line removing pins as you go. 


Fold the top and bottom pieces to the right along the stitched line. Place the swiffer on the fabric and mark the width of the left side of the  swiffer. Sew from the bottom of the duster up to the end of the small piece curving around the top. Pivot the fabric around the needle, fold the small pieces to the other side then sew down the right side of the center seam, with the same width as you did on the left side.


When finished sewing the channels for the handle, lay the fabric layers flat. Using a rotary cutter or shears, cut strips about 1/2" wide to create the "dusting fingers".  Be careful not to cut any of your previous stitching. 


When finished, slide it onto the handle and look out dust!  When they are dirty, throw them in the wash with a load of towels. They'll be good as new the next time you use them. 


Can you imagine the money you will save if you made a few of these? I love them.  

Lessons learned: 

1. I'm going to try to make the dry mop covers and dusters out of scraps of fleece I have. I think the fibers in the fleece fabric would work well for these projects. 

2. Since I created the duster, I've found another tutorial I might try next time. We shall see which one I like better. 

Happy Cleaning!