Tuesday, August 28, 2012

Camera + App

I might just  be an iPhone convert.  I've  been able to upgrade my phone for about 6 months now. I was  perfectly happy with a  full keyboard, no internet, nothing fancy phone. But when I tried the iPhone and talked with people who had one, I thought I was missing something. Now let's face it, if my nephew Cody can use an iPhone, I thought, well I can too. Of course I did the research on the other android compatible phones, but in the end I selected the iPhone. I guess the big reason was I wanted to have my musis, book and phone in the same place. Of course with the iPhone you have to have a data plan. If my postings to FB this week are any indication of how I enjoy having the internet, I'll never do with out it again.

Soon after getting the phone I started looking for the free apps. I came across the Photo + app and although not free, it was totally worth the few dollars it cost. You can change effects, add borders, share on FB or Twitter and so much more. Below is a picture I took on Ogunquit Beach. The following are a few effects created with Photo+.

Original

Auto Bright with Black Border

 Purple Haze
 Blue
 Black and White

Which one do you like best? Do you use the Camera+ App on your phone?

Lessons Learned:

1. Start practicing with this app!

Happy picture taking,
 

Ocean Inspired

Ah the beach. *sigh*.  I'm  not a sit in the sun, shake and bake kind of person, I like just looking at and hearing the water. Something about being here......


Because I don't worship the sun, there is lots of time on vacations for me to create something or think about creating something.  My creations this time included a few items of jewelry inspired by the ocean and waves.

The first is a starfish bracelet and earring set. I might sell them on Etsy, but not sure yet. I just might have to keep these.


The second is a pair of ocean wave earrings. I thought the colors and the finding with the swirl on were a match made at the beach. 

Is there a place or a mood that starts your creative juices flowing?

Lessons Learned:

1. Learn to take photographs that enhance items created. :)

*Sighing*

Thursday, August 23, 2012

Goodbye Ugly Boxes; Hello Stylish Storage

I don't like storing things in boxes, whether it be shoe boxes or any type of brown box.  I'm always trying to hide them in closets or in spaces that no one can see because they are so ugly. As of yesterday, my thoughts about using boxes for storage have changed. The tutorials listed below were an eye opener to try this right away. 

Lined Canvas Box at Mandy's Kraft Exploits
Stenciled Diaper Box at Projects at the Picketts

Many tutorials start with diaper boxes as these did. But the techniques used can be used on any size boxes. I had a need for some fabric storage so I used an empty copy paper box I had in the cellar. Here is the fabric  chose.  The tutorials will tell you what other supplies you need depending on how you want to create and decorate your boxes.

 
I used spray adhesive and hot glue to secure the fabric to the box.  I knew I was going to use a liner, so the top edges of the box stayed unfinished.
 
 When completed, I had a pretty storage container.


I can't wait to make more. More boxes, more fabric, right? :)


This project is going to be popular, I already have ideas for more, specifically for my husband whose magazines are laying all over the dining room table. He is a hunter and trapper so I'm thinking a nice box covered in camouflage would do the trick.

Lessons learned:

1. Follow the directions on calculating measurements and cutting exactly. It WILL make a difference when you start covering the box.

2. Be careful of the hot glue if you choose to use it.  Ouch!

What are your ideas for using fabric covered boxes?


Wednesday, August 22, 2012

Are You a Pinner?

Well... Pinterest is a very addicting website where you can store photos of ideas, things you like, things you'd like to try, and more or less anything you want.   I love it because it is visual. It is not a list of text links. You can create categories, or boards, for anything you want. Here is a snapshot of what my Pinterest site looks like.
I have found so many neat ideas, tutorials, recipes and crafts here. This is the first place I go to find a photo or a tutorial on how to do something.

I mention Pinterest because it is an integral part of this blog. Much of the inspiration for many of the projects here have come , in some way, from Pinterest.

The problem I have now is finding enough time to make everything I've found on Pinterest, especially with school starting in just a couple of short weeks. :(

Do you pin on Pinterest? Put your name in a comment so others can follow you on Pinterest.  If you don't use Pinterest, why not give it a try?


Pillows Finally Done

For the past six months most of the sewing I've done is for our new house; not by choice mind you.  I'm not a fan of buying pre-made curtains, pillows, etc. unless I have to. Don't get me wrong, I don't make everything, but most of the time I just can't find in the store what I really want. People, especially my husband, would say I'm too fussy. But here is why: 1. Most of the time,  if you can afford quality fabric and have good sewing skills, what you make lasts much longer than the store bought items. 2. Some of the items in the house, such as  the flooring and counter tops we just can't afford to change at this time. 3. It's easier, for me, to buy fabric that matches what we can't change than settle for store bought that just doesn't do it.  What's a person to do with blue counter tops, blue and cream marble tiles and light wood floors?

The entire interior of the house was painted white. Wow! I really needed a calm color and I liked the color of sage green we just finished painting in our living room in the previous house. So green was another color added to the mix. I finally decided on a fabric and have finished everything in the main living area except a couple more accent pieces. Today I finished the sofa pillows that seems to have taken me all summer to do. Not because they were hard, but because I wanted to create other items.

So here they are. I chose to do envelope covers to cover the pillows that came with the sofa that were the same as the upholstery fabric.  I like envelope covers because they are easy. No zippers, no buttons, no ties, etc.  I'm not a fan of reinventing the wheel, so instead of creating the entire tutorial, here are a couple of tutorials I found that show how to make the piping I added  and the covers themselves.

Envelope Pillow Cover Tutorial - by vixenMade

Piping Tutorial - from Positively Splendid

Here are a few highlights of what I did.  After cutting the fabric I needed I wanted rounded corners. I just grabbed something round I had nearby ( part of another project) and used it as a template.

 
The fabric I chose ravelled quite profusely ( of course I picked one that wasn't simple to work with) . I had to serge the edges of all the pieces I used.  I've had a serger for about 15 years. I can't imagine sewing without one. For those of you who aren't familiar with a serger, it cuts and sews and overcast stitch at the same time. 

 The money invested in this machine is well worth it if you sew a lot. It does so much more than overcast edges.
 When it was time to attach the piping I used a zipper foot and sewed close to the stitches already on the piping.

 Here you can see the back of the pillow. Just a flap over fabric makes it easy to stuff pillows in and get them out.  Please don't criticise me for not matching the fabric. This fabric was a little more pricey than I had like, and this is the back, so matching was out of the question for this project.
And here you go - pillows done finally.
 
Here are a few pictures of the drapes and curtains so you can get a sense of the colors.


Lessons learned:
 
1. Buy the best fabric you can afford. The time and effort you put into the project will be rewarded with a quality product.
 
2. When sewing curves, be sure to clip the corners. The piping will fit easier as you sew it to the main fabric and it won't pull when the project is done.
 
3. Take your time. Don't do short cuts even if you are tempted. I know!
 
Do you have a project that you thought you'd never get done and have finally completed it? I'd love to hear about it.
 

Sunday, August 19, 2012

Crate Seats and Storage

One of the first projects I pinned on Pinterest was a tutorial for seats and storage made from plastic crates. I had forgot about them until a teacher colleague of mine made them and posted them on her blog at Projects at the Pickets.  I was so impressed by what she had done, I decided this was a project I just had to do. So thank you, Kathleen, for jump starting this project for me.  Kathleen's blog has also inspired me to continue a blog I started two years ago. So here goes....

Because I have very limited space in my classroom, I decided to start with two of the crate storage seats. If I can fit them and determine a use for them, I WILL be making more of them.

I began by selecting two crates. My husband, Rich, cut two seats out of 1/2 in plywood so they would fit on the grove just inside the top of the crate.
I used some left-over fabric I had from making curtains for my classroom last year. For two seats you need about 7/8 yard of 44" wide fabric.


I covered each seat with a few layers of batting. I used a staple gun to staple both the batting and the fabric. I then used a hammer to secure each of the staples by pounding them in. 


 Basically, the fabric is wrapped around the board similar to how you would wrap a box with wrapping paper. Instead of tape, you use a staple.


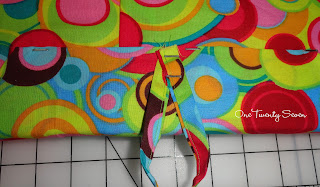
I then created a handle to lift the seats from the crate by finger pressing an 8 by 2 1/2" piece of fabric and sewing it. 

 I then stapled the loop to the board and placed it on top of the crate.


And here you go, an easy inexpensive seat and storage solution for a classroom, a kids playroom or anywhere you can imagine them.


Lessons Learned:

1. Before you purchase the crates be sure to look them over carefully. When I started working on mine I noticed one corner of the green one had a damaged corner. This made a difference when cutting the board.

2. Use as much batting for cushioning as you can but be careful not to wrap too much batting around the edges of the board. This could make the boards not sit on the crate securely.

Check out Kathleen's crate seats  at Project at the Picketts.

What  do you think?

Thanks for visiting One Twenty Seven.


This post is linked at: